Perusta sinäkin oma Blogaaja.fi blogi ilmaiseksi >>
Lainaa.com

Read Our Latest News

Category: Home Improvement

Shaker Style Cabinets

What Makes Shaker Style Cabinets a Timeless Choice

Ever picture a kitchen that just feels right? It’s classic but still totally fresh. For lots of people, Shaker style cabinets create that vibe. Their clean look has been a winner for ages. They just seem to fit in anywhere. A sleek city apartment? Yep. A cozy suburban home? You bet. Let’s dive into why these cabinets are so loved. We’ll look at their story. Their design. And how they can fit almost any style. We’ll find out why they are a forever choice for any home.

The Story Behind Shaker Cabinets

To really get why these cabinets stick around, let’s go back in time. The story starts with the Shakers. They were a community back in the 18th century. People knew them for their simple lives. They valued honesty and good, hard work. And you can see these values in everything they created. Especially their furniture. It’s a pretty cool backstory, actually.

The Shakers had a core belief. Function and beauty should go hand-in-hand. They weren’t into fancy stuff or lots of decoration. Instead, they put all their energy into quality work. Their designs were super practical. This whole mindset is what gave us the shaker-style cabinetry we see today. Those clean lines and strong build? That’s all from their idea of making things that truly last.

What Makes Shaker Cabinets Stand Out

So, what’s the deal with “Shaker style”? A few key things make this design what it is. Once you spot them, you’ll see the simple genius behind them. It’s all about thoughtful construction.

A Simple, Clean Look

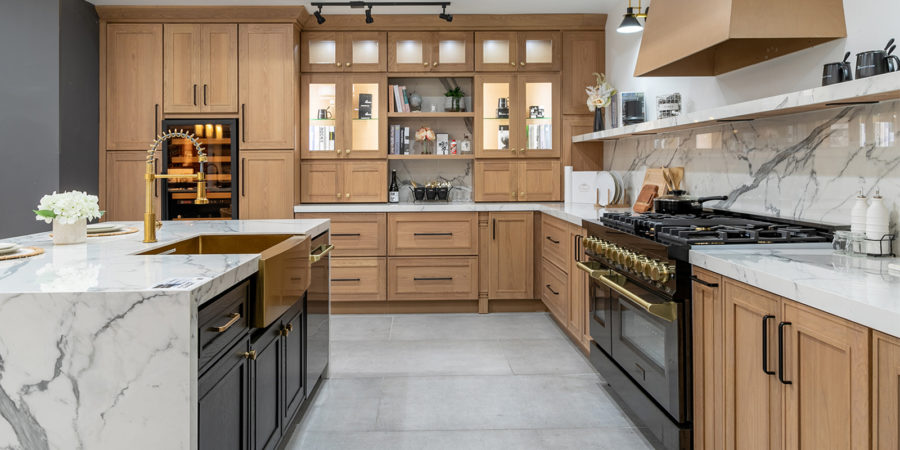
The biggest giveaway is their door design. It’s a frame-and-panel style. Each door has a flat center panel. A four-piece wood frame surrounds it. You won’t find any complex carvings. No raised bits or fancy details. This super minimal design looks so clean. It’s crisp and totally uncluttered. That simplicity really lets the wood quality speak for itself. The craftsmanship gets to be the star.

Built to Last with Good Materials

The Shakers made furniture for everyday life. It had to be tough. That tradition is still alive and well. Real Shaker cabinets are usually solid wood. Think strong woods like maple or cherry. Oak and birch are popular too. Using such sturdy materials means the cabinets are not just pretty. They are incredibly tough. For anyone living in a busy place like Chicago, you know durability is a must. This style definitely has it.

Natural Colors and Finishes

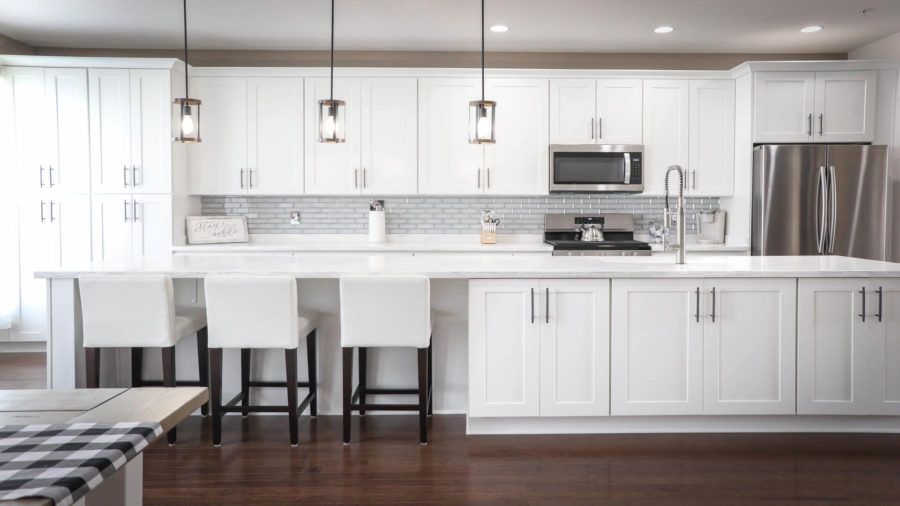
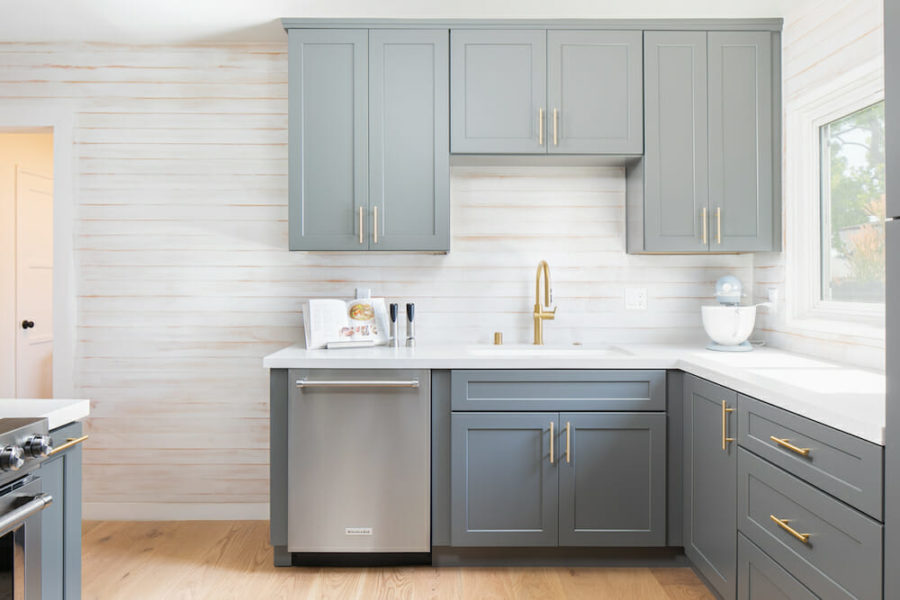
Today you can find Shaker Style Kitchen Cabinets in every color. But traditionally, their finishes showed off the wood. Light stains were common. Natural finishes were popular too. Sometimes they were painted neutral colors. Think whites, grays, and soft creams. These kinds of finishes keep the look clean. They also make matching other kitchen stuff a breeze.

Why Shaker Cabinets Are Always in Style

Trends can be so fickle, right? One minute something is in, the next it’s out. But Shaker cabinets just keep going strong. Their lasting power comes from a few key things. These strengths really make them different from other styles.

A Truly Classic Design

That simple, no-frills look is their superpower. They aren’t stuck in one time period. So they never really look old or outdated. Those clean lines just appeal to everyone. They look amazing in a historic house. They look just as good in a modern condo. This classic vibe means your kitchen won’t need an update in a few years. It will just keep looking great.

They Go with Everything

Shaker cabinets are like the perfect pair of jeans for your kitchen. They are a blank slate for your design ideas. Want a modern kitchen? Add some sleek metal handles. Throw in a quartz countertop. Boom, you’re contemporary. Or maybe you love a rustic feel. Pair them with a big farmhouse sink. Add some vintage-style drawer pulls. Now it’s cozy and charming. They just blend in so well.

You Can Count on Their Strength

A kitchen gets a lot of action. Cabinets have to handle opening and closing all day. Spills happen. Life happens. Because shaker-style cabinetry is built so well, it’s known for sticking around. When you choose these cabinets, you’re picking something built for the long haul. It’s a choice that gives you beauty and solid function for a long, long time.

Using Shaker Cabinets in Your Space

Bringing Shaker cabinets into your home is super easy. It doesn’t matter if it’s a huge remodel. Or just a small bathroom refresh. Folks searching for great shaker style cabinet doors Chicago have so many options.

In the kitchen, white Shaker cabinets are a classic move. They make the whole room feel bigger. And so much brighter and cleaner. Want something a little more dramatic? Try dark gray or even navy blue cabinets. That can create a really slick, modern mood. Pair dark cabinets with brass hardware. That adds a warm, fancy touch. Or use matte black handles for an industrial edge.

But don’t just think about kitchens. They work wonders in other rooms too. They make amazing bathroom vanities. They are perfect for laundry room storage. You can even use them for custom built-ins. Imagine them in a living room or office. Their simple design brings a calm, organized feeling to any room. If you need a special fit, our Custom Cabinetry Services can build the perfect units for your Chicago home.

The Perks of Picking Shaker Cabinets

Besides looking great, Shaker cabinets have some real-world advantages. These practical benefits make them a really smart buy for your home.

So Easy to Clean

Life is busy enough, right? The flat panels and simple design are a gift. Wiping them down is a total breeze. There are no tiny grooves for dust to hide in. This low-maintenance feature is a game-changer. It’s a huge bonus for any active household.

They Boost Your Home’s Value

Here’s a nice little bonus. Their timeless style and quality can actually up your home’s resale value. Buyers see them and think “classic” and “high-quality.” It’s a safe bet for a home upgrade. If you ever plan to sell your Chicago house, a great Shaker kitchen is a huge plus.

Options for Every Budget

Yes, custom solid-wood cabinets are an investment. But you can get the Shaker look without breaking the bank. There are so many options out there now. You can find them in different materials. There are tons of price points. This makes the timeless style available to almost everyone. You don’t have to sacrifice that look.

A Choice That Lasts

Shaker style cabinets are popular for a good reason. It’s that perfect mix of simple, useful, and beautiful. Their clean look, strong build, and amazing flexibility mean they just don’t go out of fashion. It doesn’t matter what your personal style is. Shaker Style Kitchen Cabinets give you a beautiful base that will stand the test of time.

Frequently Asked Questions

What hardware works with Shaker cabinets?

That’s the fun part. Almost anything goes! For a modern vibe, try long bar pulls. Or go with matte black knobs. For a classic farmhouse look, cup pulls are perfect. Simple round knobs in nickel or bronze also look fantastic.

Are Shaker cabinets good for small kitchens?

For sure. Their clean look is great for small spaces. It makes the room feel less cluttered and more open. If you choose a light color like white, it will really help make the room feel bigger and brighter.

Are Shaker style cabinets super expensive?

They don’t have to be. The price really depends on the material and finish. And whether they’re stock or custom. While solid wood is a bigger investment, many affordable options still give you that great, timeless Shaker look.

Brown Wood Cabinets

How to Care for and Maintain Your Brown Wood Cabinets for Longevity

Brown wood cabinets? Totally classic. They feel warm, earthy, and instantly cozy up any kitchen space. That natural vibe is hard to beat! No matter if those cabinets are slick and modern or more on the country side, taking good care of them is how you make them last. Seriously, a little care now saves huge trouble later. Make sure those beauties stay as good-looking as the day you got them.

This guide is packed with simple, real-life ways you can keep your Custom brown cabinets looking amazing. We’ll jump from quick, everyday cleaning to the kind of deep cleaning you save for weekends. These tips are going to help you get the most out of your kitchen’s starring feature. Let’s get your cabinets ready for a long, happy life!

Why Bother Taking Care?

Let’s be real—your kitchen gets lots of action. Cabinets open, close, stuff thrown in, meals prepped nearby… Messes happen all the time. Left unchecked, sticky stuff and dirty hands grind into the wood. That lovely shine starts to go.

A little effort goes a long way. When you stick to a cleaning routine, you stop moisture, stains, and wear in their tracks. Well-cared-for wood just looks richer, feels sturdier, and slides smoother. If you love your kitchen and want things working perfectly, give the cabinets a little love. They’ll thank you later.

Simple Cleaning—Every Day Stuff

Daily cleaning doesn’t mean scrubbing until your arms hurt. Nope! Most days, it’s fast and pretty painless. Even the busiest person can knock this out.

Grab a Soft Cloth

All you gotta do? Grab a soft microfiber cloth and give your cabinets a pass. Dust, crumbs, grease flecks—you’d be amazed what collects on those panels. This quick dusting stops buildup from turning into hard-to-clean grime.

Skip the Strong Stuff

Greasy prints or food splatters? No freak-out required! Just a drop of gentle dish soap in warm water will fix things. Don’t drown your cloth. Wring it out, give the spot a gentle wipe, and you’re golden.

Dry Matters Most

Water is wood’s mortal enemy. So, when you do any wet wiping, always follow up with a dry towel. Letting water sit leads to ugly spots… or worse, swollen warped doors. A minute spent drying beats months of repairs.

Keeping That Finish Fresh

There’s an invisible hero here: the topcoat. That finish blocks scratches, dings, spills, and fading. So, treat it right!

Stop Scratches and Heat Stains

Anything hot? Set it on a mat or trivet. Got something gritty or heavy? Use a placemat. Don’t let rough stuff or hot cookware sit straight on your cabinets. Little habits like these save a ton of damage over time.

The Sun’s Not Your Friend

Love lots of sunlight? Your cabinets probably don’t. Too much sun can turn your rich browns into a faded mess. Don’t stress, though—draw the blinds or hang a curtain when the sun’s blazing in. That way, color stays rich and true for ages.

Polish—But Don’t Go Nuts

Now and then, your cabinets deserve a bit of pampering. Grab a polish made just for wood (skip anything silicone-heavy, trust me) and buff them gently. Maybe every season, or just when things look dull. Gleaming in no time!

Tackling Spills & Trouble Spots

Spills happen. Kitchens are wild places! The trick to winning this battle? Get moving fast.

Zap Spills Instantly

Whether it’s a little coffee splash or a stubborn blob of sauce, the longer it sits, the more it soaks in. Grab your cloth, suds it up, and blot that spill ASAP. No stain, no fuss.

Persuade, Don’t Scrub

Stubborn grime? Take it easy. Don’t reach for scratchy pads or super-strong chemicals. Lay a damp, warm rag over the problem spot for a bit. Let the goo soften, then wipe away. Or, if you’re feeling fancy, try a gentle baking soda paste. Always sneak a test run in a hidden spot!

Smart Habits Stop Damage

It’s not just about cleaning. How you treat those cabinets day-to-day matters too. And folks around Columbus, they know—handling things gently keeps them looking sharp.

Don’t Slam Doors

Slamming drawers? Slamming doors? Oof, that’s a recipe for busted hinges and wonky doors. Easy solution: be gentle! Or better yet, get those quiet soft-close hinges. You’ll wonder how you ever lived without them.

Watch the Humidity

Seasons change, and so does air moisture. Wood hates getting super dry or crazy humid. Pop on your kitchen fan when boiling water. Keep your home temp steady too. Your cabinets will skip the swelling and cracking!

Deep Cleaning—Once in a While

Once or twice a year, go deeper. It sounds like work, but hey, the payoff is huge. Set aside a weekend, crank up your playlist, and go for it.

Everything Out, Clean Every Inch

Start by emptying your cabinets and drawers. It’s wild how many crumbs and sticky spots hide inside. Wipe down everything—inside, outside, fronts, sides, even handles. This is the deep clean that dreams are made of.

Inspect Before You Reload

Check every hinge, every knob. Tight? Smooth? Or does something wobble? If the finish is looking sad or you spot peeling, consider tackling it now. Sometimes it just takes a tweak; other times, maybe ring up a local cabinet pro.

When Do You Call the Pros?

You’ve been a cabinet hero up till now, but some jobs need a pro’s magic touch.

Big scratches, chipping, a warped door? That’s when the experts earn their keep. Good kitchen cabinet makers can repair, replace, or refinish, so your doors match perfectly. Columbus has some top-notch pros—your cabinets will soon look like new.

Frequently Asked Questions

What’s a safe cleaner for wood cabinets?

Honestly, you can’t go wrong with a small squirt of mild dish soap in warm water. Simple, gentle, cleans everything. Bart Simpson easy level! Finish up with a good dry.

Should I polish often?

Cabinets don’t love being smothered in polish. Every couple of months is plenty. Wait for things to look a bit dull, then grab that wood-friendly polish, no silicone! Buff and enjoy.

Is all-purpose cleaner okay on wood?

Probably not. A lot have strong chemicals that eat up your pretty finish. Stick with cabinet cleaners or a bit of soap. Easy does it!

5 Expert Tips for Installing Kraftsman Cabinets Like a Pro

5 Expert Tips for Installing Kraftsman Cabinets Like a Pro

Thinking about upgrading your kitchen or bathroom? Installing Kraftsman Cabinets might be one of the smartest moves you’ll make. They instantly add class, space, and value to your home. And honestly, who doesn’t love a beautiful kitchen or bathroom?

If you’re in Columbus, OH, you probably know how home upgrades can make a big difference. A clean, stylish space can change your whole mood. The best part? You don’t need to be a pro to get amazing results.

Let’s go over five expert tips that’ll help you install your Kraftsman Kitchen Cabinets or Kraftsman Bathroom Vanities like a total pro. Grab a cup of coffee — this guide’s for real people who just want things done right.

Plan and Measure Your Space First

Here’s the deal: great projects start with good planning. Before you even open the toolbox, take a step back and plan things out.

Start by measuring everything. And I mean everything — walls, ceiling height, even the corners. Write it all down. A few minutes of measuring saves hours of frustration later.

If you live in Columbus, OH, keep in mind that some homes have older walls or slightly uneven floors. That’s totally normal. Just check everything with a level before you start.

Check Wall and Floor Levels

Walls are sneaky. They might look straight, but they’re often not. Grab a level and check. You’ll thank yourself later when your Kraftsman Cabinet for Kitchen hangs perfectly straight.

Use a Measuring Tape and Level Tool

Measure twice. Drill once. That’s the golden rule. Even a small mistake can throw your cabinets off balance. Take your time. The goal here is accuracy, not speed.

Gather All the Right Tools

You don’t need a fancy workshop. Just some basic tools and a little patience. A drill, screws, level, stud finder, and measuring tape are your best friends here.

Keep everything nearby. Running back and forth for tools is annoying and wastes time.

Safety Gear Matters Too

Don’t skip safety gear. Seriously. Wear gloves and safety glasses. One slip with the drill can mess up your day.

Keep Everything Nearby

Lay your tools out before you start. Having everything within reach keeps your mind on the task. Installing Kraftsman Cabinetry becomes way easier when you’re not hunting for a screwdriver every five minutes.

Install the Upper Cabinets First

Here’s a pro tip: start from the top. Always. It’s much easier to hang upper cabinets before setting the lower ones. You’ll have more space to move around.

Mark a Level Line on the Wall

Grab your pencil and draw a level line on the wall. This line is your guide. Keep it straight — your Kraftsman Kitchen Cabinets depend on it.

Secure with Strong Screws into Studs

Find the wall studs. They’re what keeps your cabinets safely attached. Use strong screws that can hold the weight. If your home in Columbus, OH has older walls, double-check that you’re drilling into solid wood and not drywall.

Align and Secure Base Cabinets

Once the uppers are solid, move down to the base cabinets. This part is all about balance and alignment.

Put the cabinets roughly in place first. Then, take your level and make sure everything lines up.

Shim Where Needed

Uneven floors? No problem. Use shims — those thin wooden wedges — to even things out. Don’t force it. A few gentle adjustments go a long way.

Double-Check Alignment Before Tightening Screws

Before you tighten everything down, step back and look. Do the cabinets line up evenly? Are the edges flush? If not, fix it now. Once it’s tight, it’s a pain to adjust.

Doing this right ensures your Kraftsman Cabinet for Kitchen sits perfectly and looks like it came from a high-end showroom.

Finish with Doors, Drawers, and Hardware

Now comes the fun part — the finishing touches. This is where your project really starts to shine.

Adjust Hinges for Smooth Movement

Attach your doors and drawers carefully. If something looks off, don’t panic. Most hinges are adjustable. A few quick turns of the screwdriver can fix uneven doors. Smooth opening and closing make your Kraftsman Kitchen Cabinets look and feel professional.

Clean and Inspect Everything

Once you’re done, grab a soft cloth and wipe down every surface. You’ll be surprised how much dust builds up during installation.

Check that all screws and handles are tight. No loose knobs allowed! If you also installed Kraftsman Bathroom Vanities, make sure everything’s sealed properly to prevent water damage.

That small bit of care can make your cabinets last years longer.

Final Thoughts

Installing Kraftsman Cabinetry isn’t just about tools and screws. It’s about patience, care, and taking pride in your work.

With the right steps, anyone can do it. Whether you’re setting up Kraftsman Kitchen Cabinets or adding new Kraftsman Bathroom Vanities, these five tips will keep you on track.

If you’re around Columbus, OH, swing by a local Kitchen Cabinets Shop. Seeing different styles and finishes in person helps you find what fits your home best. Sometimes touching the materials and checking the colors makes all the difference.

Your kitchen is the heart of your home. When you choose a Kraftsman Cabinet for Kitchen, you’re not just buying furniture. You’re investing in quality that’ll last for years.

Take it slow. Double-check everything. Enjoy the process. Before you know it, you’ll step back, look around, and realize — hey, I actually did this myself.

That’s the magic of DIY. A little time, some effort, and a lot of pride in your work. And when your friends in Columbus, OH walk in and compliment your new setup, you’ll smile knowing you installed those beautiful Kraftsman Cabinets all on your own.

So go ahead — grab those tools, put on some music, and start transforming your home today. Your dream kitchen (or bathroom) is just a few screws away.

Frequently Asked Questions

How long does it take to install Kraftsman Cabinets?

Honestly, it depends on the space and your pace. Most installs take around two or three days. If you’re new to it, take your time. There’s no rush. Careful work gives you better results and cabinets that look amazing for years.

Can I install Kraftsman Cabinetry by myself?

Absolutely, you can. Installing Kraftsman Cabinetry isn’t rocket science. You’ll just need patience, the right tools, and a steady hand. Follow the steps carefully and double-check every move. Doing it yourself saves money and feels surprisingly rewarding once everything’s in place.

Where can I buy Kraftsman Kitchen Cabinets in Columbus, OH?

If you’re in Columbus, OH, you’re in luck. There are plenty of local Kitchen Cabinets Shops that sell Kraftsman Kitchen Cabinets. Visit a few in person, touch the materials, check the colors, and ask questions. Seeing real samples helps you make the perfect choice.

Quartz Countertop Installation: Step-by-Step Tips for Homeowners

Quartz Countertop Installation: Step-by-Step Tips for Homeowners

Thinking about redoing your kitchen? You’re in good company. Everyone wants a space that looks amazing and feels easy to maintain. And when it comes to modern style with durability, quartz kitchen countertops steal the show every time.

They look clean, shine beautifully, and last forever. But installing them? Yeah, that part can be tricky if you’re not sure what to do. Don’t stress, though. I’ve got you covered. Whether you’re tackling this on your own or just curious about the process, here’s a simple, step-by-step guide you can follow.

If you’re from Orland Park, IL, this one’s especially for you. Let’s get your kitchen looking like something straight out of a home magazine.

Why Choose Quartz Countertops?

Before diving in, let’s talk about why everyone’s so obsessed with quartz. Spoiler: there are plenty of reasons.

Durable and Long-Lasting

Quartz is tough. Like, seriously tough. It resists scratches, dents, and chips better than most materials out there. You don’t have to worry about staining or sealing either. It’s non-porous, which means no hidden moisture or bacteria creeping in.

That’s why Quartz Countertops for kitchens are such a big hit with busy homeowners in Orland Park. They can handle constant cooking, spills, and family life without breaking a sweat.

Low Maintenance

If you hate constant upkeep, you’ll love quartz. There’s no sealing, polishing, or fancy cleaner involved. Warm water and mild soap do the trick. That’s it.

For most people in Orland Park, IL, that’s a game-changer. You can have that polished, expensive look without babysitting your countertops.

Stylish and Versatile

Quartz isn’t just strong — it’s stunning. It comes in endless colors and patterns. Whether you’re into minimal white or bold marbled looks, quartz fits any vibe. It’s like getting luxury without the high-maintenance lifestyle.

Tools and Materials You’ll Need

Alright, let’s gear up. Here’s what you’ll need before you even touch a slab:

  • Measuring tape
  • Level
  • Silicone or construction adhesive
  • Clamps
  • Caulking gun
  • Quartz slabs
  • Epoxy (color-matched)
  • A soft cloth and gloves

Having everything ready before you start makes the job a hundred times smoother. Trust me.

Step-by-Step Quartz Countertop Installation Guide

If you’re planning to install Kitchen Countertops in Orland Park, follow these steps closely. Take your time. Rushing will only create problems later.

Step 1 – Measure and Plan

Start simple — grab your tape and get accurate measurements. Measure twice. Write everything down. Then measure again. Even an inch off can cause major headaches later.

Sketch out your layout on paper. Note where the seams and sink will go. A little planning now saves big trouble later.

Step 2 – Prepare the Cabinets

Your cabinets are the foundation. If they’re not level, nothing else will line up right. Use a level to check the surface. Add shims where needed to even things out.

Wipe away dust or leftover glue. You want a smooth, clean base before adding your quartz.

Step 3 – Dry Fit the Countertop

This step is like a practice run. Gently place your quartz slabs on top of the cabinets without glue. Check the fit on all sides.

Do the seams match up? Are the corners straight? Mark any adjustments before you move forward. This test fit helps you spot issues early.

Step 4 – Apply Adhesive and Set the Countertop

Once you’re happy with the dry fit, grab your adhesive. Run a thin line of silicone along the cabinet tops. Don’t overdo it — a steady bead is enough.

Carefully lower the quartz into place. Ask a friend to help; quartz is heavy stuff. Press down gently so it sets evenly across the surface.

Step 5 – Join the Seams

If you’ve got multiple slabs, now’s the time to join them. Apply color-matched epoxy along the seams. Line up the slabs perfectly and clamp them tight while it sets.

Wipe away excess epoxy immediately. Once it hardens, it’s a pain to remove. Take a moment to admire how seamless it looks when done right.

Step 6 – Seal and Finish

Even though quartz is non-porous, sealing the edges keeps moisture out. Use a thin bead of silicone where the countertop meets the wall or backsplash.

Let everything cure overnight. Don’t rush to reinstall your sink or appliances. Give it time to settle properly. By morning, your Quartz Countertops in Orland Park will be rock solid and ready for use.

Common Installation Mistakes to Avoid

Everyone makes mistakes, but you can skip the common ones. Here’s what trips up most DIY installers:

  • Forgetting to level the cabinets first.
  • Using too little adhesive or the wrong type.
  • Measuring only once (measure twice, always).
  • Moving too fast and cracking a corner.

It’s easy to get excited and hurry through it. Slow down. The patience you put in shows in the final result.

Care Tips After Installation

Congrats! Your new Quartz Countertops for kitchen look incredible. Now it’s all about keeping them that way.

Keep It Clean

Quartz is simple to maintain. Wipe spills immediately with warm water and a mild cleaner. No need for bleach or harsh stuff.

Avoid Heat Damage

Quartz can take some heat but not direct contact from hot pans. Always use trivets or pads. It takes two seconds and saves you from ugly burn marks.

Prevent Scratches

Quartz is strong, but not indestructible. Use cutting boards instead of slicing directly on the surface. It keeps your knives sharp too.

Follow these habits and your Kitchen Countertops in Orland Park will stay smooth, shiny, and perfect for decades.

Conclusion

See? Installing quartz isn’t rocket science. It just takes time, patience, and attention to detail. Once it’s done, your kitchen will look incredible — like something straight from a showroom.

If you’re in Orland Park, IL, you’ve got access to some of the best suppliers for quartz. Whether you buy pre-cut slabs or custom ones, it’s a worthy investment.

Quartz kitchen countertops aren’t just beautiful; they’re built to last. They resist wear, stay easy to clean, and add serious value to your home.

So take your time. Follow the steps. Enjoy the process. And when you finally stand back and see that glossy new surface shining under your lights — you’ll know it was all worth it.

Frequently Asked Questions

How long do quartz countertops last in a kitchen?

Quartz countertops can last for decades when properly cared for. They resist scratches, stains, and everyday wear easily. Regular cleaning and avoiding extreme heat help keep them in great shape. With the right maintenance, they can look brand new for years.

Can I install quartz countertops without professional help?

Yes, you can, but it takes patience and precision. Quartz is heavy and requires accurate leveling and proper adhesive. If you’re not confident, hire a professional. They’ll ensure your Quartz Countertops in Orland Park fit perfectly and last longer without damage.

What makes quartz better than granite for kitchens?

Quartz is non-porous, so it doesn’t absorb stains or bacteria like granite can. It’s also low-maintenance and never needs sealing. Granite has natural beauty, but quartz offers more color options and durability. Many homeowners prefer Quartz Countertops for kitchen convenience and style.

Page 2 of 2

Ilmaisen julkaisemisen puolesta: Blogaaja.fi